On this page we will share a Database created by us, present an answer to a question, and give step by step instructions as to how all of this was achieved.
Answer to the Question
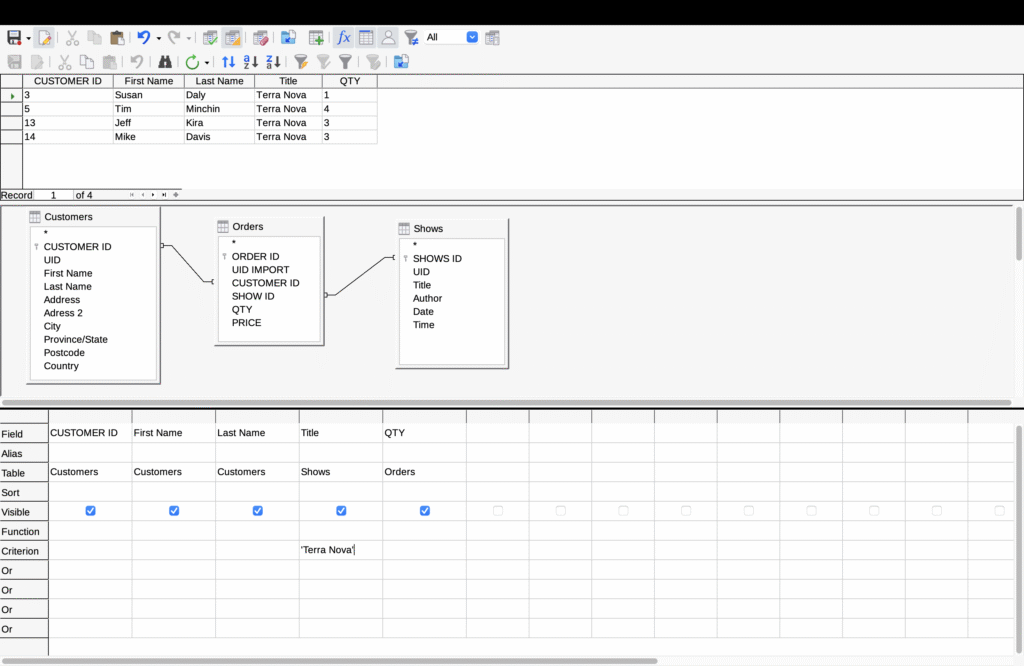
The provided question was “How many people are going to see Terra Nova?”
Eleven tickets were purchased which means eleven people are going to see Terra Nova
This query generates a specific answer by taking information from these three tables, Customers, Orders, and Shows. It then uses ID numbers to know which person belongs to which order. It matches the unique Customer and Show IDs from the table to make sure that the correct buyer is paired with the correct event. After the Criterion is added the query filters the results to only the ones titled ‘Terra Nova.’ Lastly it displays the five specific chosen information, Customer’s ID, First Name, Last Name, Title of Show, and the quantity of tickets which were ordered.
Proof/Step by Step Explanation
This step by step is for a MacOS(Apple Silicon)
- Step 1 (starting)
- Search up https://www.libreoffice.org/ (Libre Office)
- Click Download
- Add in Applications
- Step 2 (creating)
- Open LibreOffice
- On the top left click ‘Base Database’
- Create it with everything that it has on default
- Step 3 (in case of an error)
- I had encountered an error when trying to create tables because there was a lack of a functional Java Runtime Environment (JRE)
- Search up “Java downloads”
- Click on the one offered by “Oracle”
- Download the “ARM64 DMG Installer”
- Step 4 (in case of an error cont.)
- After Downloading Java follow the instructions stated on the page
- Then click LibreOffice at the top of the MacOs desktop
- Then click ‘Preferences’
- Navigate to ‘LibreOffice’ to ‘Advanced’
- Check ‘Use a Java runtime environment’
- Tables should work, but if not restart LibreOffice
- Step 5 (tables)
- Click on the Database Project file of the CSV data set provided in the project
- Double click on the ‘MT Data Set – CUSTOMERS.csv’
- Go to ‘Open with’ and choose LibreOffice
- You will see an Excel sheet type of format
- Copy all the data on the sheet
- Paste it on the ‘Tables’ section of the Database
- Then rename it “Customers”
- Check ‘Create’ and then ‘Yes’
- Repeat this process for the last two data sets in the file: ‘MT Data Set -ORDERS.csv’ (rename as “Orders”) and ‘MT Data Set – SHOWS.csv’ (rename as “Shows”)
- By now you should see three tables on your page
- Step 6 (editing Customers)
- Click the edit option on ‘Customers’ table
- In front of the “ID” write “CUSTOMER” so it reads “CUSTOMER ID”
- Make sure to click Save at the top left corner
- Step 7 (editing Orders)
- Click the edit option on ‘Orders’ table
- Then change the “PEOPLE ID” to “CUSTOMER ID
- In front of the “ID” write “ORDER” so it reads “ORDER ID”
- After “UID” type “IMPORT”, so it reads “UID IMPORT”
- Change the Field/Data Type of the “CUSTOMER ID” and “SHOW ID” from ‘Text [ VARCHAR ]’ to ‘BigInt [ BIGINT ].’
- (this is done so that the data types in each of the columns can be a whole number)
- Make sure to click Save at the top left corner
- Step 8 (editing Shows)
- Click the edit option on ‘Shows’ table
- In front of the “ID” write “Shows” so it reads “SHOWS ID”
- Make sure to click Save at the top left corner
- Step 9 (relationships)
- At the top of your desktop click ‘Tools’ then choose the ‘Relationships…’ option
- Add all of the tables you have by choosing them one by one and clicking the “Add” option
- You will see three boxes, make them as big or as small as you want, as long as you can read them
- Step 10 (relationships cont.)
- On the ‘Customers’ table click on the “CUSTOMER ID” and drag it to the “CUSTOMER ID” in the ‘Orders’ table
- On the ‘Shows’ table click on the “SHOWS ID” and drag it to the “SHOW ID” in the ‘Orders’ table
- Make sure that the connected IDs have the same data type (Steps 6,7,8) because if not there will be an error when you try to connect them
- Make sure that the relationship is connected through the Orders
- This step is important for building queries
- Click Save at the top left corner
- Step 11 (queries)
- At the left corner, under Database, under Tables you will see Queries option, click on it
- Under Tasks click on “Create Table in Design View…”
- Add all of the tables you have by choosing them one by one and clicking the “Add” option
- You will again see three boxes, make them as big or as small as you want, as long as you can read them
- Step 12 (queries cont.)
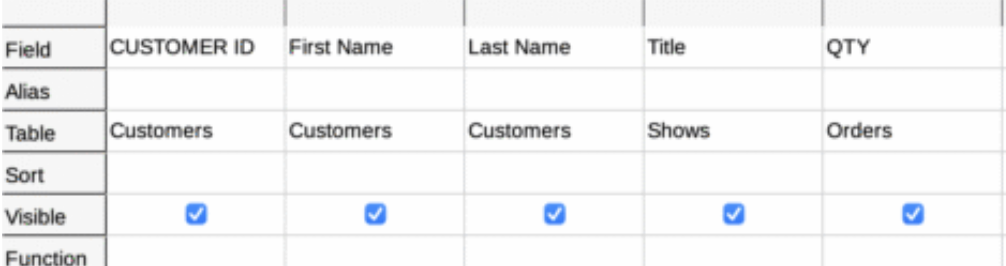
- From the ‘Customers’ table, drag the ‘CUSTOMER ID’ to the very bottom where you will see columns
- From the ‘Customers’ table, drag the ‘First Name’ to the same place again next to ‘CUSTOMER ID’
- From the ‘Customers’ table, drag the ‘Last Name’ to the same place again next to ‘First Name’
- From the ‘Shows’ table, drag ‘Title’ to the same place again next to ‘Last Name’
- From the ‘Orders’ table, drag ‘QTY’ to the same place again next to ‘Title’
- Image below for help
- At the top of the query page, about the 8th option, you will see the option ‘Run Query (F5), click on it and see the data at the top
- Step 13 (answering the question)
- This is going to the step by step for the specific question of “How many people are going to see Terra Nova?”
- At the very bottom under the blue check marks you will see the ‘Criterion’ row
- For the ‘Criterion’ row and ‘Shows’ column write ‘Terra Nova’
- Click the ‘Run Query (F5)’ button again
- You will see all of the people and the amount of tickets that were purchased for the show Terra Nova
- Lastly Click the save button again
- Step 14 (last step)
- After completing all of these steps, at the top of the desktop click ‘File’ then ‘Save as’ and save this Database into your files.
Google Drive
Here you will be provided with an additional Google Drive link to a folder, where you can find the Database file, a pdf version of the proof and some images from the Queries.
https://drive.google.com/drive/folders/1DDoXX8DQ95AbWmVJy75BUX3l5RqC7WKa?usp=sharing
Thank you:)